How to Loom Knit a Cozy Striped Hat (For Beginners!)
There’s nothing cozier than a handmade knitted hat, and it’s so simple to make one using a round knitting loom!
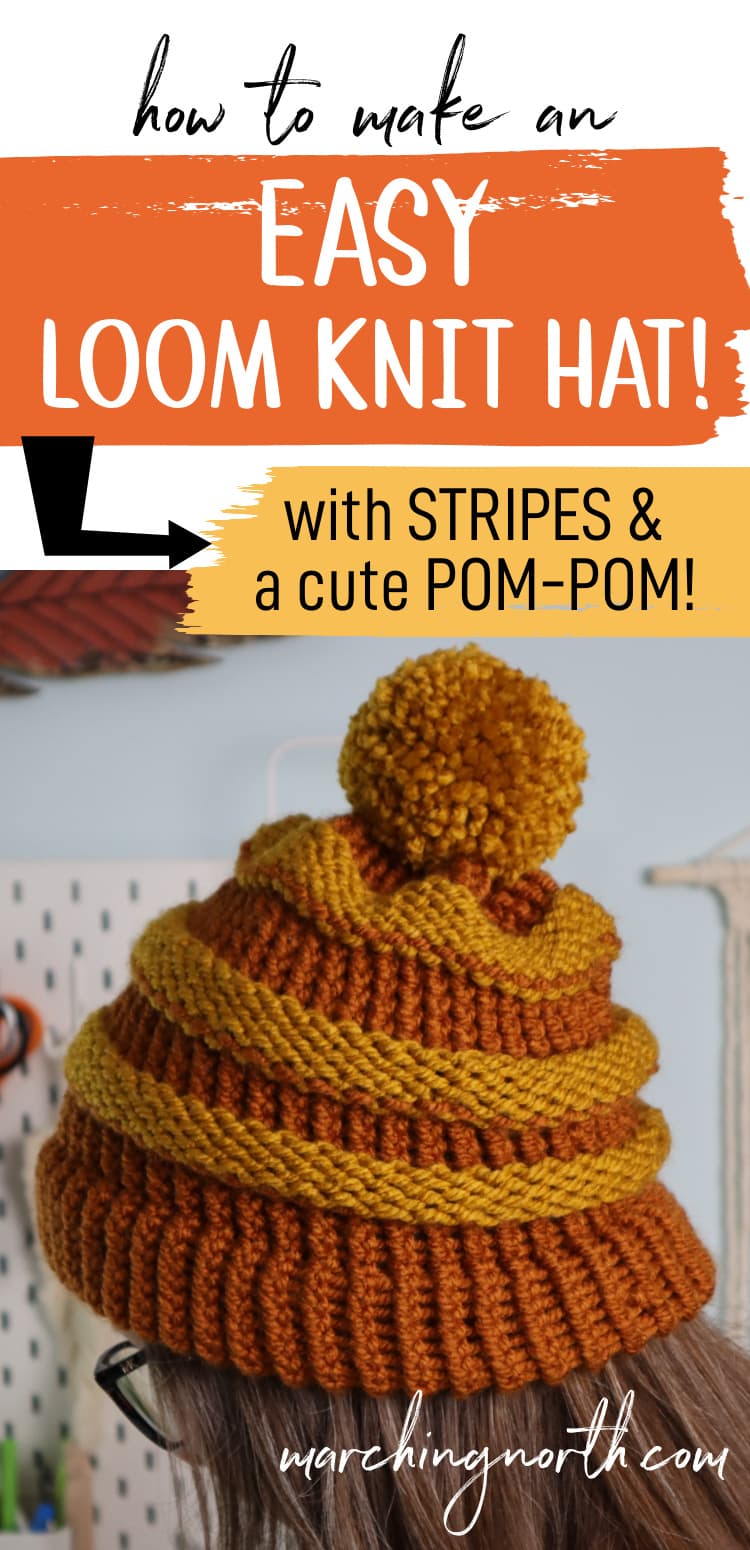
Want to remember this? Post this Striped Loom Knit Hat tutorial to your favorite DIY Pinterest board!
(This post may contain affiliate links. If you click one and make a purchase, I may receive a small commission at no extra cost to you. Read the disclaimer here. Thank you for your support!)
This loom knit hat pattern is for a slightly slouchy, striped hat with some fun texture thanks to switching from knitting to purl stitches every 5 rows.
It has a built in brim, plus it’s super warm and toasty thanks to some soft, bulky yarn.
I’ll show you how to make it step by step (even if you’re a beginner!) in this written tutorial, and there’s a video walk-through linked down below from my YouTube channel.
Before we get started, let’s talk for a minute about knitting looms and why they’re so awesome to work with!
What is a Knitting Loom, anyway?

Knitting looms are perfect if you’re not quite a knitter (yet), but you want to make some knitted hats, scarves, socks, etc.
For this project we’ll be using a circular loom, and it’s a plastic ring with a certain amount of pegs that are in a certain gauge which determines the type of yarn you’ll want to use.
Smaller round looms work for making socks, finger-less gloves and mittens, and baby hats, and smaller items.
Larger looms work better for kid sized, teen sized, and adult hats, and you can also use them to make an infinity scarf or even blankets and other loom knitting projects depending on the technique.
It’s important to use the correct size yarn for the gauge of loom you have.
The loom I’m using for this tutorial is a large gauge loom, and it works best with chunky or bulky yarns, or two pieces of worsted weight yarn held together.
Smaller gauge looms have smaller pegs and more of them, and work with finer yarns.
You can also get long looms, or a knitting board, which is commonly a long rectangle shape. They’re great for making loom knit scarves and blankets.
There are other types of looms as well, like an afghan loom that’s shaped in a large figure 8 and is perfect for making blankets.
Type of Knitting Loom You’ll Need for this Hat Pattern
Back to the loom I’m using in the tutorial below- it’s a KB loom and it came in a set with a few other sizes of looms.
If you have a Knifty Knitter loom that’s about the same size that will work as well.
My large gauge KB round loom has 48 pegs. You can make this hat with any number of pegs, just keep in mind if you use a smaller loom you’ll get a smaller hat.
This makes a large adult size hat, which is perfect if you have a bigger head size. My head is about 23″ in circumference for the record.
This loom knitting set works with chunky yarn and is perfect for making hats, gloves, and slipper socks!
Best yarn for this loom knit hat
You’ll need to use a bulky yarn to go along with the large gauge loom.
My favorite yarn for making loom knit hats is Amigo Chunky by Hobbii.
It comes in lots of really pretty colors, and it’s nice and soft and the perfect thickness for the large gauge KB round loom.
A few other chunky yarn options that would work are:
You can also use worsted weight yarn and just double it up so it’s thick enough. Feel free to get creative with it!
Stay away from cotton yarn for this project though, it’s not stretchy enough for a knitted hat and it isn’t super warm.
Cozy Striped Loom Knit Hat Free Pattern
Check out the video tutorial from my YouTube channel, Yarn Stash with Marching North. Click here to subscribe!
Materials You’ll Need
- Amigo Chunky acrylic yarn – 1 skein each of the following colors:
Tools You’ll Need
- Large round knitting loom and loom hook (48 pegs)
- Yarn or tapestry needle
- Scissors
- Stitch marker (or small piece of scrap yarn)
- crochet hook (optional, to help weave in ends)
Instructions
Slip your stitch marker one one of the pegs. This will be your starting peg for each round.
Make a slip knot and attach it to the starting peg.
E-Wrap Cast On:
Wrap the yarn around the peg to the left of the starting peg in a clockwise motion. This is called the e-wrap method.
Continue e-wrapping around each peg until you get back to the first peg. There will be one loop on each peg, and the first peg will just have the slip knot on it.
Slide the loops down to the bottom of each peg, and then make another pass wrapping each peg above the first loop.
When you get all of the pegs wrapped twice, take the hook and pull the bottom loop up over the top loop and off of the peg. Do that all the way around with each peg.
Rows 1-5:
Continue making e-wrap knit rows until you have 15 all together (not counting the cast on row).
Make the Brim:
Once you get 20 rows completed, it’s time to fold it up to make the brim of the hat.
Look at the starting peg and follow the line of stitches down until you get to the starting edge where the knot is.
Pull the loop to the right of the knot up through the center of the loom and place it onto the starting peg.
Then continue putting each loop from the starting edge of the hat onto the pegs. You’ll end up with a folded brim that is double thick and a nice, clean edge that doesn’t roll up on you.
Once you have all the starting loops on the pegs, use the hook to bring the bottom loop up over the top loop and off each peg.
Knit 5 Rows:
E-wrap knit 5 more rows after the brim with the same color of yarn.
Switch colors and Purl 5 rows:
Cut the working yarn you’ve been wrapping with, leaving about a 5 inch tail and lay the tail in the center of the loom.
Grab the next color, and hold the end of it with the end of the first color of yarn.
Tie a knot with the two colors of yarn, and don’t worry if there’s a bit of space between the knot and the stitches, we’ll tighten that up later.
Now you’re going to do 5 rows of purl stitches with the new color.
Purl stitches are made by holding the yarn UNDER the loop on the peg, and then insert the hook down through the loop, scoop up the yarn you’re holding across and pull up a loop.
Carefully remove the original stitch from the peg, and put the new loop on the peg. Then tighten it by pulling the yarn.
Repeat Knit and Purl sections:
After you finish your 5 purl rows with the contrasting color, cut the yarn the same way you did before and tie on the original color.
Make 5 knit rows using the original color.
Repeat this back and forth until you have 35 rows all together AFTER the brim row. I ended up with 4 knitted sections (not counting the brim) and 3 purl sections.
You’ll end on a knitted section.
Finishing off the hat:
Now it’s time to finish off the top of the hat. Wrap the yarn around the loom once, plus a little extra, and cut the yarn.
This will give you enough yarn to finish off the top.
Thread the end of the yarn onto your yarn needle. Bring the needle up through each stitch and pull the yarn through.
You can remove the stitch from the peg now, or wait until you have them all threaded on and remove them all at once (which is what I did).
Once you’ve sewn through all the loops all the way to the last peg and removed the hat from the loom we can cinch up the top of your hat.
Pull on the yarn to close the hole in the top of the hat.
Sew through a few stitches around the cinched up circle, pull the yarn really tight and tie a knot.
I like to stitch across the hole one way and then the other way to form a cross, pull it tight and tie another knot to make sure the hole doesn’t come open later.
Weave the end of the yarn under several stitches and cut off the excess yarn.
Before you weave in all the ends from the color changes, untie the knots and tighten them up a bit.
Don’t pull too tight so that it doesn’t get puckered on the outside, but just tight enough that there isn’t a gap.
Now weave in all the ends and cut the excess yarn.
Turn your loom hat right side out and it’s finished!
At this point, I decided to add a pom pom to the top of my hat using the gold colored yarn.
Pom Poms!
You can see how to add a pom pom in the video above, or check out this tutorial for a little more detailed pom pom instruction!
A pom pom is totally optional for this hat, but I think it really kicks the finished hat up a notch.
Over on my YouTube channel, I have two video tutorials for making pom poms, one for yarn pom poms and one for faux fur pom poms and they’re perfect for your finished projects.
Check them out below!
In Conclusion
I hope you enjoyed this tutorial and you’ll make one of these warm, striped loom knit hats for this winter!
There’s nothing wrong with being a loom knitter instead of a traditional knitter, as long as you get a cozy hat out of the deal it doesn’t really matter, now does it?
Looking for more loom projects? Check out these tutorials!
Free Loom Knitting Projects and Patterns
How would you modify this pattern to make a child sized hat? I really have enjoyed learning how to loom knit from your tutorials, they are so well done!
just got a loom set looking for the cuff sock slippers pattern
do you have one Thank you