Macrame Mermaid Tail Keychain DIY // Tutorial + Video
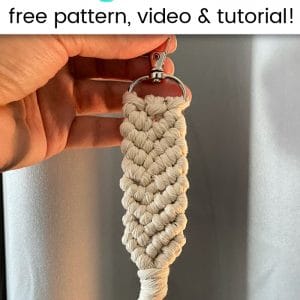
Learn how to make a simple DIY macrame mermaid tail keychain in this step by step tutorial!
Macrame keychains are one of my all time favorite projects. They’re quick, functional, and usually pretty easy to make!
This mermaid tail macrame keychain definitely fits in all of those categories, plus it’s super cute.
If you or someone you know is a big fan of mermaid stuff, this is the perfect macrame project to try! Especially if you’re looking for a last minute DIY gift idea.
Don’t forget to pin this for later!

(This post may contain affiliate links. If you click one and make a purchase, I may receive a small commission at no extra cost to you. Read the disclaimer here. Thank you for your support!)
The knots used in this keychain are the larks head knot, diagonal double half hitch, and the wrapping knot.
They’re all pretty easy, although the diagonal double half hitch can take a little practice to get just right. This is a great way to practice it!
Oh hey, while you’re here, did you know I started a Facebook group all about macrame that you should totally check out if you haven’t already? If you’re already a member, awesome yay!! If not, here’s the details…
Join the Macrame for Beginners and Beyond Facebook Group!
If you’re new to macrame or if you’ve been knotting for a while, connecting with other macrame lovers is always a great idea!
Come check out our Facebook group, Macrame for Beginners and Beyond. It’s a friendly community where you can ask questions, get inspiration, and share your awesome work with other macrame lovers! Come join the conversation today!
Grab your PRINTABLE copy
Macrame Mermaid Tail Keychain – Printable PDF Pattern!
Reference this pattern any time you want with the printable PDF version! It’s ad free, large print, and includes full photo tutorial!
Now, let’s take a look at what supplies you’ll need to make this adorable mermaid tail keychain.
Supplies You’ll Need to Make a Macrame Mermaid Tail Keychain
- 3 mm single strand macrame cord in the following lengths
- 3 pieces @ 48″ long (main cords)
- 1 piece @ 20″ long (wrapping knot cord)
- Keychain clasp
- Brush (for fringe)
- Macrame Board or Corkboard
- T-Pins
- Sharp Scissors
Related: Best Places to Get Macrame Cord (and Other Macrame Supplies)
Macrame Mermaid Tail Keychain Tutorial
Step 1: Attach the cords to the keychain clasp
First you need to attach your three 48″ cords to the keychain clasp by folding them in half and using larks head knots to secure them.
Then, pin the clasp down to your macrame board or cork board and it’s time to start knotting!
Related: Basic Macrame Knots for Beginners (Video & Written Tutorials)
Step 2: Tie diagonal double half hitch knots
The majority of this keychain is made with diagonal double half hitch knots.
Start on the left and make two diagonal double half hitch knots going down and to the right.
Then on the right, make three diagonal double half hitch knots going down and to the left.
This will form a nice V shape. Continue this process for six more rows (there will be seven all together).
For the eighth row, starting on the left you’ll do the one diagonal double half hitch down and to the right, then you’ll hold both the filler cord AND the working cord from the first knot together and tie the second diagonal double half hitch over them both (down and to the right).
Then switch over to the right side and do the same process. The first diagonal double half hitch down and to the left will be normal.
For the second knot, you’ll hold the filler cord and the working cord from the first knot together and tie the knot over them.
Related: Macrame Wristlet Keychain (Tutorial & Video!)
Step 3: Finish with a wrapping knot
Now it’s time to tie the wrapping knot at the bottom. Grab the 20″ long piece of rope and hold it against the ends in a U shape (like the first picture above.)
Then begin wrapping firmly right under the last row of double half hitch knots. Wrap around four times.
Thread the end of the cord you’ve been wrapping with through the loop underneath the wraps (the bottom of the U you made earlier).
Then pull the short cord sticking out of the top of the wraps until the loop slides up under the wraps about halfway. Don’t accidentally pull it out of the top!
Trim the two ends of the wrapping knot and push them up under the wraps.
Step 4: Cut fringe, brush, cut, brush, and repeat
Now for the fun part! Cut the fringe at the bottom in an inverted V shape (like a fish tail, or a mermaid tail in this case).
Grab your macrame fringe/pet brush and brush it out really well. I sprayed mine with some Aleene’s Stiffen Quik spray to help it hold it’s shape.
Once it’s brushed out, trim it again back into the upside down V shape.
Done!
I hope you enjoyed this Macrame Mermaid Tail Keychain tutorial! This was a fun project to make and it was super quick which is always one of my favorite kinds.
If you make one of these, please come share a picture on Instagram and tag me @marchingnorth so I can take a look! I love seeing all of your awesome creations.
Join the Macrame for Beginners and Beyond Facebook Group!
If you’re new to macrame or if you’ve been knotting for a while, connecting with other macrame lovers is always a great idea!
Come check out our Facebook group, Macrame for Beginners and Beyond. It’s a friendly community where you can ask questions, get inspiration, and share your awesome work with other macrame lovers! Come join the conversation today!
Related Macrame Posts
- Macrame Wristlet Keychain // Tutorial + Video
- Macrame Wall Plant Hanger // Tutorial + Video
- DIY Macrame Market Bag // Tutorial + Video
- Macrame Troubleshooting (No More Running Out of Cord!)
- Double Macrame Hat Hanger | Free Pattern & Video!
- Macrame Half Circle Mini Wall Hanging | Free Pattern + Video!
- DIY Macrame Mason Jar Hanger | Free Pattern + Video!
- Best Macrame Books (for Beginners and Beyond!)
- Woven Diamonds Macrame Wall Plant Hanger – Free Pattern & Video!
Hi (:
Just wondering ist that 3 Macrame Chords each 48″ long? or together 48″ long?
Thanks (:
Hi! They’re 48″ long each. Thanks for stopping by!
You know the video is an excellent way to get to know your knots only with all the links tagged in the video it’s blocked the area that you kinda need to see if you want to follow the steps (?!?). I’m thinking it’s wonderful to promote others in the DIY community or have the links to help support your own Vlogs however it really would be great to be able to see what I’m trying to do so maybe a little more thought into the placement of the links that pop up on the screen or perhaps figuring out a way to have them hidden until someone actually “clicks” on that particular item… just sayin cause I really REALLY want to try this but finding a tutorial on how to do it is proving to be harder than one would think. Thanks for sharing though because I’ll be saving it and doing the best I can with the tools I’ve got! TTFN
I’m not sure what tagged links you’re talking about?