Dollar Tree DIY Mini Macrame Wall Hangings!
Learn how to make some adorable and affordable DIY framed macrame wall hangings in this step by step tutorial and video!
Want to remember this? Post this Mini Macrame Wall Hangings tutorial to your favorite DIY Pinterest board!
(This post may contain affiliate links. If you click one and make a purchase, I may receive a small commission at no extra cost to you. Read the disclaimer here. Thank you for your support!)
I’ve had a couple of framed wall art thingies I got at the Dollar Tree sitting in my craft stash forever. Like since last year…
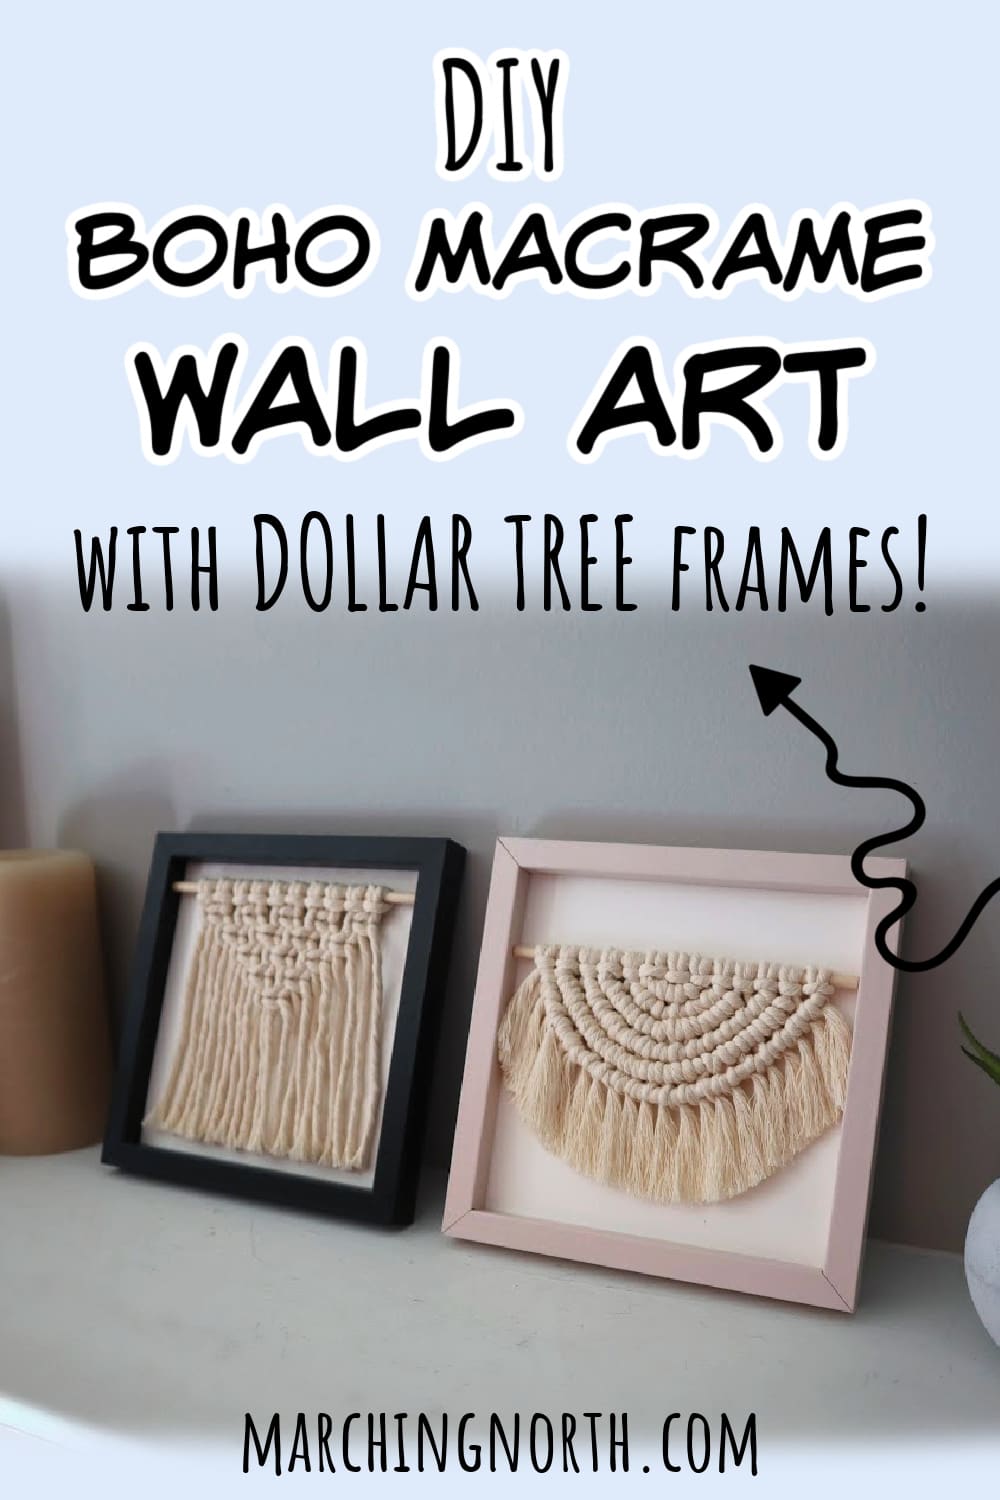
The other day I was looking at them and it hit me, one of these frames would be perfect to display a mini macrame wall hanging!

The finished wall hangings would look amazing on your gallery wall, and if you’re looking for a trendy DIY gift, look no further.
All you need for this macrame project are a couple of frames (like I said, I found mine at Dollar Tree, but you can use any small frame), a small wooden dowel, some cotton cord, a glue gun, and a few basic knots.
Keep scrolling to see the full tutorial for these cute macrame wall hanging patterns (plus video) down below!
Macrame for Beginners
Are you new to macrame? Check out my Basic Macrame Knots for Beginners post to learn all the simple knots you need to know to make just about any macrame pattern, including:
- square knot
- double half hitch knot
- larks head knot
- spiral knot
- and many more!
Where to Get Macrame Cord and Supplies
Sometimes it can be tricky to find good quality macrame cord. Check out my Macrame Cord and Supplies post to see all of my favorites and where you can find them!
Join the Macrame for Beginners and Beyond Facebook Group!
If you’re new to macrame or if you’ve been knotting for a while, connecting with other macrame lovers is always a great idea!
Come check out our Facebook group, Macrame for Beginners and Beyond. It’s a friendly community where you can ask questions, get inspiration, and share your awesome work with other macrame lovers! Come join the conversation today!
Supplies You Need
- Dollar Store frames: The ones I used are both about 6.5 inches on the outside of the frames and about 5.5 inches on the inner part of the frame. You can use different sizes for these, it just needs to be something similar. NOTE: If your frame comes with glass, you’ll want to remove it.
- Wooden Dowel: I’m using a 3/16 inch dowel that’s 12 inches long. I was able to cut a mini dowel for both of my pieces of wall art from that one dowel. You’ll just want to measure how far across it is on the inside of your frame and cut your dowel to fit.
- Cardstock: I cut down two pieces of cardstock to cover the image on the backing board of the wall art. If yours is a removable image, you can skip this step.
- 3 mm single strand macrame cord
- Wall Hanging #1: 10 pieces @ 22″ long each
- Wall Hanging #2: 7 pieces @ 30″ long each, and 5 pieces @ 20″ long each NOTE: My fringe was like an inch and a half, two inches long by the time I was done. If you want to make it a little bit longer you’ll want to make your cords longer to start. I recommend you add maybe like 5 or 6 inches to all your cords if you want longer fringe.
- Comb or brush for fringe
- Hot glue gun with glue sticks
How to Make DIY Framed Boho Macrame Wall Hangings
Check out the video for this tutorial right here, and be sure to subscribe to Marching North so you don’t miss any new videos!
Mini Macrame Wall Hanging #1
Step 1: Tying the knots
First, attach the 10 pieces of cord to your mini dowel using lark’s head knots. Once you get them all attached, you can just use some Scotch tape to tape your dowel down to your work surface.
Now we’re going to tie some square knots.
Starting on the far left, take those 4 cords and tie a square knot. Then repeat that all the way across until you have 5 knots all together.
For the next row, you’re going to skip the first 2 cords on the left and then tie a square knot using the next four cords. Then you’ll repeat that across, so you’ll have four square knots all together. You’ll also skip the last 2 cords.
For the third row, you’re skipping the first 4 cords, tying 3 square knots, and then skipping the last 4 cords for the second to last row.
Repeat this pattern until you have an upside down triangle of square knots. The last row will have 1 square knot right in the center.
Step 2: Cutting the fringe
Now it’s time to cut the fringe.
I just took my frame and stuck it over the top and marked about where I wanted the fringe to be cut with some Scotch tape.
Then I held my wall hanging up while I cut the fringe. Using the tape as a guideline really helps cut it a lot straighter.
After you get the fringe trimmed down, run a bead of hot glue across the back of the dowel and glue it into place in the frame.
First wall hanging complete!
Mini Macrame Wall Hanging #2
For the second wall hanging, we’ll be making a macrame semicircle.
Row 1
Attach two of the 30 inch pieces to the dowel with lark’s head knots, and tape your work down to your work surface.
Take the left cord and use it as a filler cord to tie three double half hitch knots going across to the right.
NOTE: If you aren’t sure how to tie a double half hitch knot, I have a double half hitch knot tutorial right here that shows exactly how it’s done nice and slow for beginners.
After you finish your 3 double half hitch knots, we’re going to attach our cord to the dowel over here with a one sided lark’s head knot.
Bring your cord in front of and above the dowel (you’ll have to untape this side so you can get behind the dowel).
Then you’re going to bring the end down behind and then pull it through that loop you just made and tighten it up over next to the other knots.
Now you’re going to bring it up behind the dowel and bring it down in front of it and down through the loop again.
This makes a lark’s head using one end of the cord. Tighten it up and your first row is done.
Row 2
Attach another 30 inch long piece of cord on the right of the knots with a larks head knot.
Then you’re going to retape your dowel back down and use the right most cord as your filler cord to tie 4 double half hitch knots going across to the left.
Once you finish the fourth one, there will be a big space. Now we need to add another cord to our filler cord.
Take one of the 20 inch cords and attach it to the filler cord with a cow hitch knot, which is just a reverse Lark’s head knot.
Slide it up next to the other double half hitch knot so it blends in and finish your last double half hitch knot of this row.
Then you’re going to take this end of the cord and bring it up in front of the dowel.
Bring the end down through the loop and then you’re going to bring it up behind the dowel and bring it down through the loop again.
Rows 3-6
You’re going to repeat this process for all the rows.
At the beginning of the row attach your next 30 inch piece of cord over, tape your dowel back in place and you’re going to repeat. Do the same thing, tying double half hitch knots across until you reach a space, and then you’re going to add another 20 inch long cord.
You’ll add one 20″ cord on each row when you reach a gap.
Then attach your filler cord to the dowel with a one sided lark’s head knot at the end of each row.
You’ll need to make 6 rows all together.
Cutting the fringe
Once you have 6 rows finished and it’s time to cut the fringe. I used the shortest piece of fringe as a guide and just eyeballed it. You can measure if you want it to be more precise.
If you want to brush out your fringe, do that now and give it another trim.
Now it’s time to glue it in place. Run a bead of hot glue across the back of the dowel and carefully glue it in place.
Done!
In Summary
These small macrame wall hanging Dollar Tree DIY’s turned out so cute, and I think they totally look like something you would buy at a store like Anthropologie or even Target or somewhere.
Plus it’s a great way to use up some scrap cord!
If you make some of these, please share a pic over on Instagram and tag me @marchingnorth so I can take a look. I love seeing all of your awesome creations!
Thank you so much for such an easy to follow tutorial. I’m just starting out, and really wanted to learn how to do the semi circle!
So cute! If I wanted to double the size, would I just double the amount of strings? Sorry for the sill question!
If you wanted to double the length across you would double the amount of strings, but if you want to make it longer as well they’d need to be a longer length. I hope that helps! Good luck!