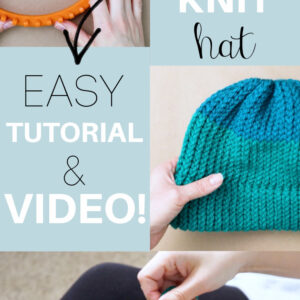
How to Knit a Hat on a Loom | Easy Beanie Pattern for Beginners
Are you feeling the urge to make some cozy winter hats, but you don’t know how to knit or crochet?
A knitting loom makes it super easy, even for beginners! In this tutorial, I’ll show you how to knit a hat on a loom the easiest way possible.
Want to remember this? Post this Easy Loom Knit Hat tutorial to your favorite DIY Pinterest board!

(This post may contain affiliate links. If you click one and make a purchase, I may receive a small commission at no extra cost to you. Read the disclaimer here. Thank you for your support!)
When I first tried to learn how to crochet, I failed miserably. Like epic fail. But I really wanted to make some winter hats, and I found some knitting looms at my local craft store and decided to give them a try.
It was a revelation! Finally, I was able to make a cozy hat that actually FIT and didn’t require a lot of skill or stitch counting.
This is a very simple hat pattern, and to jazz it up a bit I used two different colors of yarn to make a color blocked effect.
You can also use one color if you prefer, or you can use more than two colors. Changing your yarn colors out is really simple and I’ll show you exactly how it’s done!
What is a Knitting Loom?
Knitting looms are a great way to make your own knitting projects. You can use them for scarves, hats, socks, and lots of other knit projects.
There are many different types of looms and they all have different specific uses so it’s important to know which one is right for the project you’re making before you start.
For loom knitting hats, you’ll want a round loom (sometimes called a circular loom).
There are different sizes of round looms (the one I’m using below is an adult size) and different gauges (for fine yarn or bulky yarn, we’ll be using a bulky size loom today).
I recommend getting a set that comes with multiple sizes. The set I’m using came with an adult size, a baby size, and a smaller round loom size for making socks. All of the looms in the set are gauged for bulky yarn.
This loom knitting set works with chunky yarn and is perfect for making hats, gloves, and slipper socks!
The adult size works perfectly for my head size, and it also works great for my husband and my two kids who are 8 and 10. We all have pretty big heads!
Best yarn for a loom knit hat
It’s important to make sure you’re using the correct size of yarn, or yarn weight, for your loom gauge. Since we’re using a larger gauge knitting loom in this tutorial, you’ll want bulky size 6 yarn.
I’m using super soft and cozy Amigo XL yarn from the Hobbii website. Some other great choices include:
- Red Heart Soft Essentials
- Brava Bulky
- Bernat Softee Chunky
- Lion Brand Yarn Hue + Me (love the colors of this yarn!)
You can also use worsted weight yarn (like Red Heart Super Saver Yarn) and just double it up so it’s thick enough. These hats look really cool with two different strands of yarn in contrasting colors held together!
The only yarn I really recommend avoiding is cotton yarn because it doesn’t have much stretch and won’t make a very comfortable hat. Also, it’s not very warm.
Pom Poms!
After you learn how to knit a hat on a loom, you’ll need pom poms to complete it! Well, pom poms are optional, but they’re so much fun and super easy to make.
I have two video tutorials for making pom poms, one for yarn pom poms and one for faux fur pom poms and they’re perfect for your finished projects. Check them out below!
If you want to make a basic beanie without a pom pom, I won’t judge you. I just love pom poms!
More Loom Knitting Patterns
If you’re looking for some more easy to follow loom knitting patterns, check out these 10 Easy & Free Loom Knitting Patterns for Beginners! It includes patterns like…
…and more!
Supplies You’ll Need to Make a Loom Knit Hat //
Materials
- 2 skeins of size 6 bulky weight yarn in coordinating colors (or one skein that’s at least 100 yards if you want to do one color)
Tools
- Large round knitting loom and loom hook (48 pegs)
- Yarn or tapestry needle
- Scissors
- Stitch markers (or small piece of scrap yarn)
Easy Loom Knitting Beanie Free Pattern (tutorial & video)
Check out the video tutorial from my YouTube channel Yarn Stash with Marching North. Click here to subscribe!
Step 1: Slip your stitch marker one one of the pegs. This will be your starting peg for each round.Make a slip knot and attach it to the starting peg.
(Note: The type of loom I’m using doesn’t have an anchor peg, but if yours does you can skip using a stitch marker and just attach your yarn to the anchor peg. You would make your first stitch on the peg to the right of the anchor peg.)
Wrap the yarn around the peg to the right of the starting peg in a clockwise motion. This is called the e-wrap method.
Continue e-wrapping around each peg until you get back to the first peg. There will be one loop on each peg, and the first peg will just have the slip knot on it.
Step 2. Slide the loops down to the bottom of each peg, and then make another pass wrapping each peg above the first loop.
When you get all of the pegs wrapped twice, take the hook and pull the bottom loop up over the top loop and off of the peg.
Do that all the way around with each peg.
Continue knitting e-wrap rows that same way until you have 20 rows all together. The cast on row counted as row 1.
Step 3: Once you get 20 rows completed, it’s time to fold it up to make the brim of the hat.
Look at the starting peg and follow the line of stitches down until you get to the starting edge where the knot is.
Pull the loop to the left of the knot up through the center of the loom and place it onto the starting peg.
Then continue putting each loop from the starting edge of the hat onto the pegs. You’ll end up with a folded brim that is double thick and a nice, clean edge that doesn’t roll.
Once you have all the starting loops on the pegs, use the hook to bring the bottom loop up over the top loop and off each peg.
Step 4: To make a two color beanie, knit 10 more rows and then we’ll change color. Alternatively if you want a one color beanie, just go ahead and knit 20 rows.
Step 5: For the two color beanie, cut the working yarn you’ve been wrapping with, leaving a 5 inch tail and lay the tail in the center of the loom.
Grab the next color, and hold the end of it with the end of the first color of yarn. Then wrap around all the pegs with the new color.
Use the hook to knit off 3 or 4 stitches, and then go back and tie the ends of the two colors of yarn together in a knot.
Step 6: Continue knitting with the new color of yarn for this row and 9 more (10 rows all together).
Note: If you want to make a more slouchy hat, feel free to add a few more rows.
Step 7: Now it’s time to finish off the top of the hat. Wrap the yarn around the loom one and a half times and cut the yarn. This will give you enough yarn to finish off the top.
Thread the end of the yarn onto your yarn needle. Bring the needle up through the first stitch and then pull the loop off the peg.
Repeat that with the next peg to the right and until you get to the last peg and the hat is off the loom.
Pull the end of the yarn to cinch up the top. Sew through a few stitches around the cinched up circle, pull the yarn really tight and tie a knot.
If there’s still a hole, stitch across the hole one way and then the other way to form a cross, pull it tight and tie another knot.
Step 8: Weave the end of the yarn under several stitches and cut off the excess yarn. Do that with the rest of the yarn ends.Turn your loom hat right side out and it’s finished!
(Optional) Step 9: If you want to, now you can add a pom pom to the top of your hat! Check out these easy video tutorials to make some of your own:
In Conclusion
I hope you enjoyed this tutorial showing how to make your own loom knit hat!
If you make one of your own, please share a picture over on Instagram and tag me @marchingnorth so I can see it.
I love seeing all of your awesome creations! It makes my day!
Related Posts
- How to Crochet a Ribbed Beanie Hat | Free Pattern & Tutorial
- Super Easy Crochet Baby Booties | Free Pattern & Tutorial
- Macrame for Beginners (the Ultimate Guide!)
- How to do Punch Needle with Yarn (Ultimate Beginner’s Guide)
How to Knit a Hat on a Loom
In this tutorial, I’ll show you how to make a loom knit hat that's easy enough for beginners and beyond.
Tools
- Large round knitting loom and loom hook (48 pegs)
- Yarn or tapestry needle
- Scissors
- Stitch markers (or small piece of scrap yarn)
Instructions
- Slip your stitch marker one one of the pegs. This will be your starting peg for each round.
Make a slip knot and attach it to the starting peg.
(Note: The type of loom I'm using doesn't have an anchor peg, but if yours does you can skip using a stitch marker and just attach your yarn to the anchor peg. You would make your first stitch on the peg to the right of the anchor peg.) - Wrap the yarn around the peg to the right of the starting peg in a clockwise motion. This is called the e-wrap method.
Continue e-wrapping around each peg until you get back to the first peg. There will be one loop on each peg, and the first peg will just have the slip knot on it.
Slide the loops down to the bottom of each peg, and then make another pass wrapping each peg above the first loop.
When you get all of the pegs wrapped twice, take the hook and pull the bottom loop up over the top loop and off of the peg. Do that all the way around with each peg.
Repeat steps 3-5 until you have 20 rows all together. The cast on row counted as row 1. - Once you get 20 rows completed, it’s time to fold it up to make the brim of the hat. Look at the starting peg and follow the line of stitches down until you get to the starting edge where the knot is.
Pull the loop to the left of the knot up through the center of the loom and place it onto the starting peg. Then continue putting each loop from the starting edge of the hat onto the pegs.
You’ll end up with a folded brim that is double thick and a nice, clean edge that doesn’t roll.
Once you have all the starting loops on the pegs, use the hook to bring the bottom loop up over the top loop and off each peg. - To make a two color beanie, knit 10 more rows and then we’ll change color. Alternatively if you want a one color beanie, just go ahead and knit 20 rows.
- For the two color beanie, cut the working yarn you’ve been wrapping with, leaving a 5 inch tail and lay the tail in the center of the loom.
Grab the next color, and hold the end of it with the end of the first color of yarn.
Then wrap around all the pegs with the new color. Use the hook to knit off 3 or 4 stitches, and then go back and tie the ends of the two colors of yarn together in a knot. - Continue knitting with the new color of yarn for this row and 9 more (10 rows all together). Note: If you want to make a more slouchy hat, feel free to add a few more rows.
- Now it’s time to finish off the top of the hat. Wrap the yarn around the loom one and a half times and cut the yarn. This will give you enough yarn to finish off the top.
Thread the end of the yarn onto your yarn needle. Bring the needle up through the first stitch and then pull the loop off the peg.
Repeat that with the next peg to the right and until you get to the last peg and the hat is off the loom.
Pull the end of the yarn to cinch up the top. Sew through a few stitches around the cinched up circle, pull the yarn really tight and tie a knot.
If there’s still a hole, stitch across the hole one way and then the other way to form a cross, pull it tight and tie another knot. - Weave the end of the yarn under several stitches and cut off the excess yarn. Do that with the rest of the yarn ends.
Turn your loom hat right side out and it’s finished!
- If you want to, now you can add a pom pom to the top of your hat! Check out the tutorials I linked to earlier if you want to make one.
Recommended Products
As an Amazon Associate and member of other affiliate programs, I earn from qualifying purchases.
Hi, I recently started looming. When I purchased my set the biggest loom I got has 41 pegs big I think the spacing is a little wider between pegs though. Do you have any suggestions for making the stitches tighter or should I just get thicker yarn? Thanks! Loved your tutorial by the way!!
Hi! I’m just wondering how many total rows there should be when finished? How many pegs and rows would you recommend for a child’s hat (ages 4-9)?
For an adult sized hat with this pattern, you knit 20 rows, fold it up to make the brim, and then knit 20 more rows. For a child’s hat, I’d recommend using a smaller loom- probably a 36 or 41 peg loom. It all depends on the size of the child’s head- my kids have pretty big heads (lol) and my 4 year old would do best with a 41 peg loom hat.
As for the number of rows, I’d say for the brim maybe 16 rows would be good before you fold it. Then continue and make 16 more rows. I’d do a test fit before you bind off and make sure it’s the right size (you can always add an extra row if you need to) and that should do it!
Hi, I’ve been wanting to try loom knitting for a while but I’ve not found a tutorial I could follow, until I came across yours. You have made it so easy to follow & understand. I can’t wait to get going now. Thank you