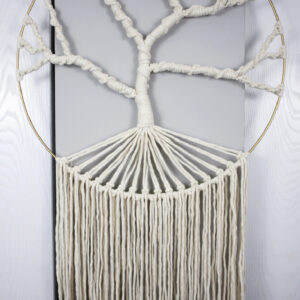
Macrame Tree of Life Wall Hanging (Free Pattern & Tutorial!)
Check out this free macrame tree of life pattern! You can make a beautiful wall hanging and it’s surprisingly easy to do. I’ll show you everything you need to know to make one yourself!
Want to remember this? Post this free Macrame Tree of Life Pattern to your favorite DIY Pinterest board!

(This post may contain affiliate links. If you click one and make a purchase, I may receive a small commission at no extra cost to you. Read the disclaimer here. Thank you for your support!)
If you’ve been wanting to learn how to make a macrame tree of life, you’re in luck! I created this simple pattern that is almost entirely made with one basic knot.
You can really get creative with this and make the branches look the way you want them! The branch portion of this project is very free form and fun to make.
Below you’ll find the written step by step tutorial for this project. If you find any part of it a bit confusing, I definitely recommend that you watch the video because some parts are just hard to explain and easier to show.
OK, let’s make this fun Macrame Tree of Life!
Looking for More Free Macrame Wall Hanging Patterns?
Check out this list of 16 free macrame wall hanging patterns with video tutorials and written instructions!
Supplies You’ll Need to Make a Macrame Tree of Life Wall Hanging
- 4 mm single strand macrame string in the following lengths:
- 16 @ 134″ long (main cords)
- 32 @ 36″ long (for fringe)
- 1 @ 60″ long (for wrapping knot)
- 19″ Metal ring
- Sharp scissors
Related: Best Macrame Cord & Supplies (and Where to Find Them!)
Macrame Tree of Life Tutorial
Step 1: Attach main cords to the ring
Before you begin, find a spot to hang your metal ring while you work. A clothing rack with an S hook works great, or you can hang it from a nail in the wall.
Attach each of the main cords to the upper half of the ring with cow hitch knots (reversed lark’s head knots).
Now that you have the cords attached, you’ll need to tie an extra half hitch on each side of the cow hitch knot.
Space the cords out evenly on the top half of the ring and it’s time to start the branches!
Related: Macrame for Beginners (Ultimate Guide!)
Step 2: Tie spiral half hitch knots to form branches
The only knot we’re going to use for the branches of the tree is a half hitch spiral knot. Here’s how you tie it!
That’s all there is to it!
Now that we have the half hitch spiral figured out, it’s time to create the branches. This part of the pattern is pretty free form and you’re welcome to get creative with it and make it your own.
I’ll show you how I did mine, but I’m not going to give exact numbers of knots for the branches since it’s more about eyeballing it and seeing how things look as you go.
To start out, I tied several knots in each pair of cords going all the way across. This is one part that I did do a specific number of knots (but you can do yours differently if you want!) Here’s how many I did for each section.
Related: Macrame Mandala Wall Hanging (Tutorial & Video!)
Next, I skipped the first section and connected the next two. Then I skipped one and connected the next two and repeated that pattern all the way across.
To connect two sections, you’ll pick a cord on the left (go for a longer one) and use it to wrap all the way around the cords of both sections. The knots are tied the same way as before, just around more cords.
I tied six knots to connect the sections, but feel free to tie more or less.
After you get those branches attached, you can really start having fun with it. You want your branches to all gradually converge in the middle where the trunk will be.
Related: Large Boho Macrame Wall Hanging (Tutorial & Video!)
One important thing to note is if you notice one of your cords is starting to get short, just swap it out and use a different cord to tie the knots.
You can switch the cord your using at any time, just drop it and pick up a longer cord and continue tying the knots.
Step 3: Wrap the trunk
OK, the biggest part of the project is finished. Now it’s time to make the trunk!
Grab the 60″ piece of cord and use it to tie a wrapping knot around all of the cords in the center.
Wrap until the trunk is as long as you like. Don’t forget to leave space for the roots! We’ll tackle them next.
Step 4: Create the roots
Now we’re going to attach the “roots” to the ring with double half hitch knots.
Pull the cords back so they’re hanging back behind the ring. Then, starting with the farthest cord on the left, tie them to the ring with double half hitch knots.
Continue that all the way across until all the cords are attached.
Related: 10 Best Macrame Wall Hanging Kits
Step 5: Add some extra fringe
At this point the fringe is pretty sparse, so we’re going to fluff it up a bit!
First, we’re going to tie 16 Rya knots going all the way across. You’ll need 16 pieces of the 36″ long cords for this step.
To tie the first Rya knot, you fold one of the pieces of cord in half. Then wrap the one end of the cord around the second cord from the left, going around the right side and bringing it back through in the center.
Bring the other end of the cord around on the left cord and bring it back through in the center. Then slide it down toward the ring to tighten it.
If this sounds super confusing, watch the video – it’s one of those things that’s just easier to show you!
Continue tying Rya knots all the way across.
Now we’re going to add a bit more fringe in between the Rya knots.
Grab the remaining 16 pieces of 36″ cord and tie one piece to the ring between each Rya knot using a lark’s head knot.
Alright, now we’ve got all our fringe attached (whew!)
It’s time to trim it down nice and neat.
Done!
I hope you enjoyed this macrame tree of life pattern and tutorial!
If you make one of your own, be sure to share a picture of it over on Instagram and tag me @marchingnorth! I love seeing your creations, it makes my day!
This project brought a smile to my face as the tree of life was my first macrame projected….well attempted…..it was in a macrame book with instructions and hardly any pictures…..it would read something like attach multiple cords on your ring (??) with overhang knot; attach larkshead knot… continue making spiral knots continue with every other string (??) This was back in 1975 when my daughter was just a baby. She just loved to play with all the long cords falling to the ground!!! Needless to say, that project never materialized. However, I did make many plant holders, easy and some a bit more complicated. Fast forward 50 years later, my daughter recently asked me about making a tree of life for her family ! and up popped your instructions. I must say much easier and clearer to follow. So thank you for explaining it so well as I make another attempt on this project even though it is 50 years later!!!
Can you add beads to the branches? Also can you just add color strand in the middle as your going?
I would like to make this in a smaller size, can you give measurements for that?
Hello.
I am interested in making the tree of life. Is it possible to double the size and if so, what size cord would I use and how much? I like doing things in a bigger way and thought this would look wonderful on my empty wall in my living room.
Thanks in advance,
Lydia
I think you could but it would have to have more “branches/cords” original would look pretty bare.